Content found in this wiki may not reflect official Church information. See Terms of Use for more information.
Zoom Webinar Use for Stake Conference
> Meetinghouse Technology > Virtual Meetings
How to host a Stake Conference using a Zoom Webinar
Stake conferences, multi-stake devotionals and other large non-interactive meetings can be held effectively using Zoom’s webinar feature. This article discusses how to setup and conduct a Stake Conference (or other large W
Terms
- Webinar – a one way broadcast with one or more speakers (panelists) and many viewers (attendees)
- Webinar host – the person who is controlling the meeting
- Panelist – someone whose video and audio can be seen and heard during a webinar. This can be controlled by them as they mute and unmute their video and audio or controlled remotely by the host through spotlighting.
- Attendee – someone who is viewing the webinar at home. They can interact with chat or raise their hand to ask a question. If they raise their hand the host can ignore them, turn on their audio, or make them a panelist, which would also show their video.
- Spotlight – the host can select which video feeds show up on attendees’ screens by spotlighting those video feeds. One or more can be on screen at the same time. All panelists’ mics are inserted into the meeting unless muted, regardless of whose video is showing.
Scheduling a stake conference Webinar
- Hit Host a meeting, Webinars, and Schedule a Webinar on the main Zoom portal.
- Set panelist videos to be on. This can’t be changed while the meeting is running.
- Add the email addresses of the panelists (this can be done later) and hit the blue Schedule button.
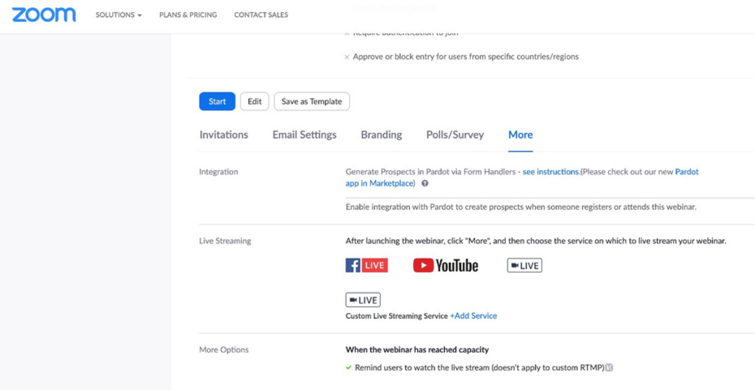
- If you are going to use a Custom Live Streaming Service for overflow you can set it up now – it will be at the bottom of your screen after hitting schedule. If you are using Facebook or YouTube, you will set this up after your event starts (instructions at the bottom of this document.)


Setting up devices to be used as content sources (cameras, PowerPoint, overlays, etc.)
- Set up one device in your stake center which will be connected to the overhead projector. This device needs to be able to join a Zoom Webinar, but it will join as an attendee and not as a panelist. It will always show what the remote viewers will see. This is how the people in the stake center will see a remote speaker, any pre-recorded music video, and any slides that might be shown. For my event, we use an iPad connected to the projector via HDMI and plugged into power to keep it from dying mid-event.
- Here is a picture of an iPad driving the overhead in my building.
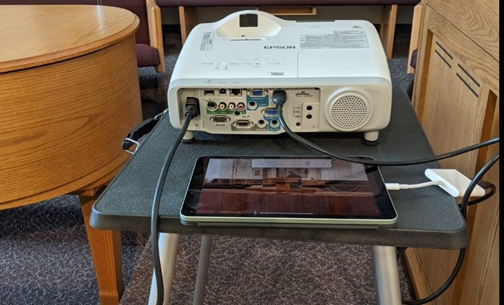
- Here is a picture of an iPad driving the overhead in my building.
- Set up a device in your stake center which will be your main camera. This can be a phone mounted 5-6 feet in front of the podium with its rear-facing camera pointed at the podium and positioned at about eye level for the average speaker. It can also be a PC with a webcam or a PC with a mounted PTZ camera connected to it via a video converter. This device should join the Webinar as a panelist. The meeting host can promote this device to be a panelist after it joins, if needed (the device will display a prompt screen which will need to be acknowledged prior to becoming a panelist.) This device will not need much interaction, if any, during the meeting, but you should probably have an assistant STS sitting where they can see the device’s screen and deal with any unexpected prompts that might show up.
- The picture below shows my center camera which captures the speaker at the podium during talks. It is positioned behind the first row of seats. I’ve also included a picture of the phone holder we attach to the boom mic stands that were already in our building. This seems to take up less visual space than a tripod and can easily fit between rows.
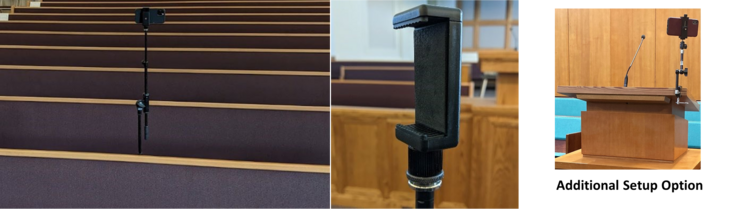
- The picture below shows my center camera which captures the speaker at the podium during talks. It is positioned behind the first row of seats. I’ve also included a picture of the phone holder we attach to the boom mic stands that were already in our building. This seems to take up less visual space than a tripod and can easily fit between rows.
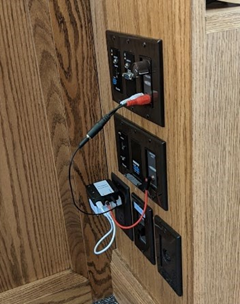
- Set up one device that has its output connected to the building audio input and its mic connected to the building’s audio output. This can be device mentioned in the previous step or a device dedicated to the purpose. An easy option is to wirelessly connect via Bluetooth audio device, if you are using one normally for sacrament meeting broadcasts. The only difference from your sacrament meeting broadcasts is that the Bluetooth audio device “line out” needs to be connected to your building’s audio input.
- Below is an image of the TinySine connected in a Stake Center building. The red wire connects the building’s audio output to the TinySine’s input and the black wire goes to a RCA jack that connect the TinySine’s output to the building’s input. The white wire and white box provide USB power.
- Set up any additional cameras in the stake center. It may be nice to have at least one broader view – perhaps near the back of the chapel, toward the side. These devices will also need to be set as panelists. If you would like to use one or more existing mounted cameras, this can be done by joining the webinar as a panelist on the PC which has the camera views. In our case, one PC is connected to a video switcher with multiple cameras – this PC connects to the webinar as a panelist.
- Set up the remote PC or PCs which will be injecting slides or pre-recorded music. These should also be set to be panelists. If a speaker in the stake center would like to advance their own slides using their own device, their own device should be joined to the zoom meeting as a panelist, but their audio and mic should both be muted. For the remote PCs injecting pre-recorded music (assuming the music is both video and audio) hit share screen and be sure to select the options to optimize for video and music. The music to be shared can be paused until the meeting is ready for it.


Run the meeting
- During the meeting the meeting host determines which video is playing by selecting “spotlight for everyone” or “replace spotlight” on the video of the panelist to be shown. All other panelists will be hidden from the attendee views. If two speakers are to be shown at the same time, the host can spotlight both of them.
- When pre-recorded music is to be played, the host asks the person running the remote PC to unmute their audio by selecting that option next to that panelist (3 dot menu, ask to unmute). Once the audio has been unmuted that person shares their screen (the host will give them permission to do so.) At the end of the music the panelist re-mutes their audio, stops sharing, and the host switches the video back to the camera they would like attendees to see.
- When a slide deck is to be shown, the host spotlights the PC showing the slides.
Tips
- Most panelist mics should be muted during the meeting. Even when their video isn’t spotlighted, their mic, if on, will still be heard by the attendees. The host can mute a panelist’s audio if there is too much noise, but the host cannot unmute. The panelist must do that.
- You might consider having an out-of-band chat preconfigured with everyone who is participating or running a camera.
- The host of the meeting doesn’t need to be in the building. In fact, to conserve bandwidth, it might be best for the host to be at their home.
- Have a cohost for redundancy.
- The device which is connected to building audio doesn’t ever need to mute its mic unless there is too much noise in the stake center when a panelist not in the stake center is presenting. If that is the case, someone will need to be near that device to unmute it when audio switches back to the stake center. For example, the mic might be muted while a remote panelist speaks but then unmuted when the meeting shifts back to the stake center.
- If you are injecting remote music, such organ or piano music, that you would like the congregation in the stake center to sing along with, you need to mute the stake center’s mic – otherwise the attendees will hear the injected music and congregation out of sync. By muting the stake center mic, the attendees will just hear the injected music. While the host can mute any panelist, including the one representing building audio, the host cannot unmute them, so if this device will be muted during the event be sure someone is manning it in order to unmute it.
- Pay attention to device power. Be sure you understand how long your devices can run without power and provide a power cord for anything that is going to be cutting it close.
Supporting more than 500 attendees
The Zoom license provided by the Church supports up to 500 attendees within a single webinar. As a stake conference is likely to include more than 500 attendees you can accomplish this in two ways. Here is how you do it using the built-in Livestreaming capabilities.
Start your webinar as the host (I haven’t found a way to do this ahead of time – luckily it is easy).
- Hit the “More” three dots at the bottom of your zoom window:

- Select “Live on YouTube”
- A browser window will pop up and you may have to authenticate to YouTube with the account you want to Livestream with (unless you had previously logged in). Upon logging in you will be presented a screen similar to this:
- Hit “Go Live!”.
Now, every attendee beyond the 500th will automatically be sent to this Livestream when they attempt to join the Webinar. If your stake uses a YouTube channel to post other content and you use that channel’s account when logging in, members of your stake can go to that channel directly instead of going to your Zoom webinar page first. This is also a good option for viewing the meeting on a smart TV or other device that doesn’t have the zoom app but easily streams YouTube.
Click here for more information about Live streaming from Zoom on YouTube.
Inviting Panelists
It is pretty easy to promote an attendee to a panelist during a meeting, but if you know ahead of time who the panelist is and their email, you can make their joining process easier and the host doesn’t have to watch for them to join. You do this by editing the webinar and going to the bottom of the form – in the invitations section hit Edit on the far right.Then just enter their name and email. They will be sent a link only for them, which will make their joining the webinar a one-click experience and they will come in as a panelist with no interaction from the host.
Managing the spotlight
The spotlight can be used to shift which video is showing for the attendees. It is usually best to keep on video on the screen at a time. The first time you spotlight a video the option, under the three-dot menu, is “spotlight for everyone”. After that, to change who has the spotlight, hit the three-dot menu in the upper right of the video you want to spotlight and then select “replace spotlight.” Both menus are shown below.
However, if you want the video being sent to attendees to show two or more panelists do the following:
- Start by clearing existing spotlights. This can be found in view menu in the upper right.
- Select “Remove All Spotlights”
- Then, select the three dot menu of the first video you want to spotlight and hit “spotlight for everyone”
- Select the 3 dot menu for all remaining videos you want to spotlight and hit “Add Spotlight.”