Content found in this wiki may not reflect official Church information. See Terms of Use for more information.
Church Network Manager
From TechWiki
Jump to navigationJump to search
> Meetinghouse Technology > Meetinghouse Networking
Church Network Manager (CNM) is the Replacement of Technology Manager ( TM )
- Login
- Website: CNM.ChurchofJesusChrist.org
- The old website TM.ChurchofJesusChrist.org will forward to CNM.ChurchofJesusChrist.org
- Use the same username and password used for TM
- CNM will perform all the same network management functions as TM
- The dashboard page after login will show the buildings in your assigned area or you will be able to search for the property:
- Network details of a property
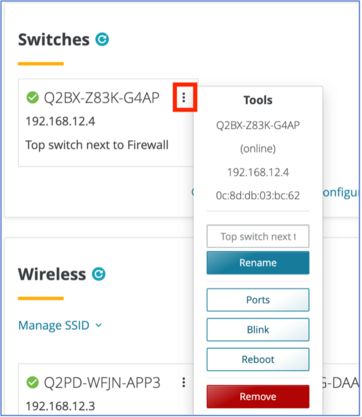
- Switch Management
- Click on the three dots next to the Switch serial number
- Rename: Label the switch with a meaningful name
- Ports - configure each port on the switch – see port configuration below
- Blink - Blinks the status light on the front panel of the switch
- Reboot - restarts the switch which causes temporarily network outage for connected devices
- Remove - Removes the switch from this network
- Switch Port configuration:
- Assignment - assign the correct configuration. See Switch Installation / Configuration Guide
- LLDP - data that Meraki provides for each connected Meraki device
- Enabled - Green check = enabled, Circle = disabled
- POE - informs you if the port is Power Over Ethernet (PoE) enabled
- Connected – informs you that a device is connected to this port
- Click on the three dots next to the Switch serial number
- Wireless Management
- Manage SSID
- Set the password for the Lehi SSID - must be set before Lehi can be enabled
- Set a schedule for the Liahona SSID - If a schedule is set, you cannot disable Liahona.
- Enable or Disable Lehi and Liahona SSIDs by using the toggle button
- Click on the three dots next to the Wireless Access Point (AP)serial number
- Manage SSID
- Menu Functions:
- Add Devices: add a Switch or Access Points to this network using the device serial number
- IP Assignment: assign a fixed IP address to a device that must have the same IP address
- Group Policy: add devices that need to bypass the Liahona Splash Screen
- Zones: Add zones to the network (Workforce)
- Filter Policy: configure the firewall to be managed, moderate, or strict
- Change Log: records any change on the network
- Blink Firewall – blinks the status light on the firewall
- Reboot Firewall – reboots the firewall, causes temporary outage, no settings lost
- Remove Network - removes the network from CNM and from the property, All settings will be lost.


