Content found in this wiki may not reflect official Church information. See Terms of Use for more information.
Audio input
> Meetinghouse Technology > Virtual Meetings
Understanding Audio Connections in Meetinghouses
As we begin to stream sacrament meetings from meetinghouses it is important to understand how to connect the building audio system to your phone, laptop or other broadcast device which will be streaming the event, to ensure a good quality experience for those who will be participating remotely. While it is possible to simply use the microphone that is on your phone or laptop as audio input for the stream, this microphone will likely pick up much of the background noise in the room – coughing, crying, and talking. Using the audio output from the sound system as input into your stream will minimize these effects and help those who are joining remotely to hear and understand.
Finding the output jack in your chapel
Your first challenge is to find the output jack in your chapel – the thing you will use to connect the output of your building’s audio system to the input of your devices. There is likely one or more 3.5 mm or RCA audio jacks in your building. Some may be used for input and some for output. The output jack, often labeled “line out” will be the ideal connection point for your device’s input signal. In newer buildings these are often on the side of the pulpit. In older buildings the output jack was used for a tape recorder which was usually in an out-of-the-way location under the sacrament table, under the clerk’s desk, on a back wall, or in a drawer near one of those areas. Since the tape recorder is no longer needed, you can use the jack it was using to connect building audio to your device.
Here are some examples of output jacks that might be found in your building.
The switched jack on the far right should be toggled to the “Record” setting.
If your jack is under the sacrament table or clerk’s desk you may need to crawl under there to find it. They are often in the very back near the top and not visible unless you are under the table or desk.
If you are unable to find an output jack in your building check in the library for the wireless hard-of-hearing headset receivers. Instructions for using the receiver are included later in the document.
Understanding different plug and jack standards.
One challenge you may face is that with 3.5 mm plugs is they may fit in the jacks but will not provide the right connection. Understanding these plugs will help you get this right. The commoni phone-plug style cables use TS, TRS, and TRRS plugs and come in 3 standard sizesii: ¼ inchiii (6.35 mm), 3.5 mm and 2.5 mmiv. The 3.5 mm (headphone) plug is very common and is likely what you use to connect devices to your car audio, home stereo, and your phone. RCAstyle jacks are common in older buildings. They are not described in detail below, but they are two conductor jacks, functionally equivalent to the TS jack described below. If you have RCA jacks, use an RCA to 3.5 mm cable whenever the document below calls for an aux cable.
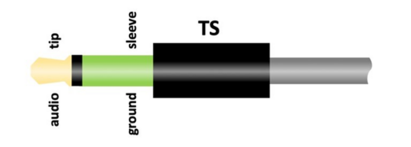
The TS cable plug shown below is an example of a standard, unbalance audio connector, with the audio signal riding on the tip and the sleeve being used for ground.
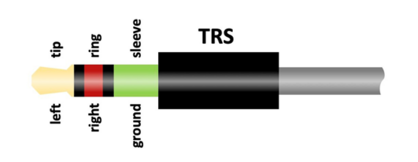
Your building may have TS jacks, but it is far more likely it will have a jack designed for stereo output described next. Most audio cables created for carrying stereo output use a TRS (Tip Ring Sleeve) plug which three segments in the plug body (3 conductors). Often these are called Aux cables.
The tip of the plug usually carries the left channel audio, the middle carries the right channel audio, and the ground is closest to the connecting wire.
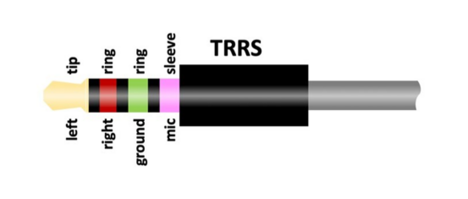
A TRS cable (aux cable) will most likely be compatible with the audio output jacks on your podium. However, the jack on your phone (if it has a headset jack) is most likely expecting a TRRSv plug because your phone not only needs to send audio to your headphones, but it also needs to receive signal from a microphone, allowing you to talk on the phone. The added conductor splits the space held by the sleeve in a TRS plug. Laptops that have headset input may have the same type of jack.
The TRRS plug above uses the sleeve as the microphone conductor. This is the CTIA standard, or sometimes call LRGM (left right ground mic). This is common for Android and Apple devices. The other potential configuration is OMTP or LRMG, with the sleeve being used for ground.
Connecting your device to building audio
The final step is to connect the output jack you found in your chapel to the input jack of your device.
If you plug a TRS cable into your phone or laptop, it will likely short between mic and ground which is fine if you don’t intend to use the mic (maybe you are in your car plugging your phone into the stereo to play music) but if you are trying to use the microphone, like you will be when broadcasting a meeting, this cable will not work.
If you plug a cable with TRRS plugs at both ends into the jack at your podium (which expects a TRS plug) it will not have the necessary connection from the podium jack to provide input to the microphone connector in your device.vi
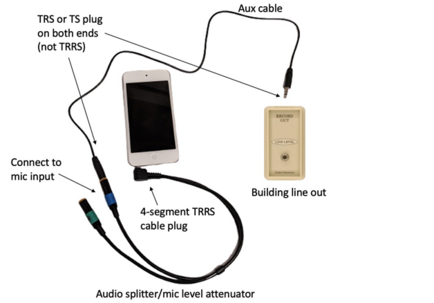
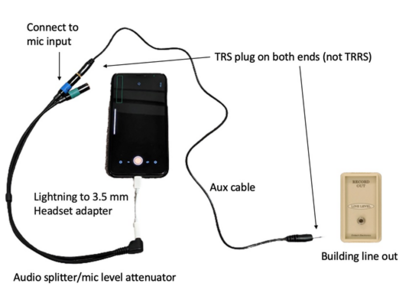
In order to insert the building audio into your device as mic input you will likely need an audio splitter cable designed to both separate and attenuate the mic conductor. The attenuation is needed because your building is likely sending 300 mV peak audio signal and the mic input in your device is likely expecting 50 mV peak audio signal. Additionally, your device may be looking for some impedance in order to detect something is there. A device that has been found to work is the Headset Buddy Line-Level Input Audio Plus Headphone Monitoring with Built in Attenuator Adapter for iPhone, Smartphones which can be found here or here. (Look for SKU 01-iPhone-Mic-Line-Plus.) This device has a 12 KΩ resistor inline with the mic conductor and a 2 KΩ resistor spanning the mic and ground conductors to which in combination allows your device to detect the presence of a mic input and attenuates the signal to 1/6th its original amplitude. In the unlikely case your building has an audio jack which operates at line level (1.7V) you will need a attenuator with a different ratio.
If your device has a 3.5 mm headset jack, you plug the 4-segment TRRS plug of the adapter into your device and plug the mic input (blue end if using the above cable) into the line out jack of your building using a standard aux cable (TRS).
If your device doesn’t have a 3.5 mm headset jack you will need to use its charging port. To use it, get an adapter for your device that converts its charging port to a headset jack. You may already have this adapter – often it come with your device. If you buy one be sure it works with a headset (with microphone) and not just headphones. This device from Apple has worked in our testing. For Android devices which use USB-C, this device has worked in our testing.
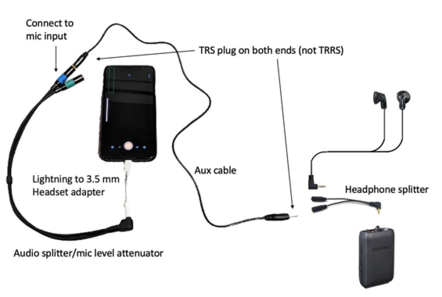
If you are unable to find an output jack in your building check in the library or Clerk’s Office for the wireless hard-of-hearing headset receivers. These won’t be as good as directly wiring to your building’s audio system, but they will be adequate. For the receiver to turn on, headphones must be plugged into it. Some listening devices have two headphone jacks in them. If so, plug the headphones into one of the jacks and use the other jack as if it were building line out. If your listening device only has one jack you will need a headphone splitter (like this). Plug headphones into one of the splitter outputs, and use the other output as your building line out. You may need to tweak the volume to get the output level correct.
Final words
When setting up your building audio it is important to realize that the audio experience will be different when the chapel is full. Set up and test prior to the meeting but verify sound quality when the chapel is filling. Ideally, you will have someone watching the stream who can provide feedback on the stream quality. Note that if you are using the Church’s webcasting system there will be between 30 and 120 seconds of delay, so once you make an adjustment you will need to wait to determine if it had the desired effect. Generally, we advise setting the delay to the minimum.
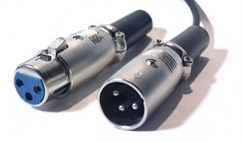
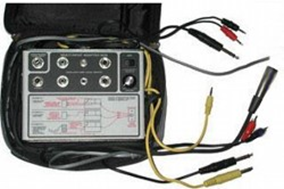
A word of caution with respect to the XLR input jacks in the building. You may be tempted to split this and use one end as input to your device and the other end as input to your building’s sound system. The building audio system is putting 48 volts of phantom power to power the condenser mic and you could find this voltage also present on the line connecting to your device. When using XLR jacks in your audio setup use the Church’s crab boxvii described here to convert to a safe TRS signal.viii
If you are having problems with your audio signal here are a few things to check.
- Make sure the audio jack you are connected to is “line level” meaning the output intended to be connected to a device with relatively high impedance (100 to 600 Ohms). If the output voltage of your jack exceeds 1.7 volts you are likely connected to a jack that was intended to be used for a speaker or headphones and it will clip if the audio volume is too high and be too quiet if the volume is too low. Avoid using a speaker or headphone output jack if you can, but if this is your only option, carefully adjust the audio volume of the system (the crab box described above makes this easier.)ix
- Check your cable quality and distance. Heavier gauge (AWG) cable is generally better. If you need to connect over a long distance, consider using a balanced output with an XLR cable connected a crab box.
- Verify that you are actually plugged into an output instead of an input. Your building’s audio system probably has jacks for both. Look for labeling that says “line out” or similar.
- If you are getting significant echo you may have an output signal from your device connected to its microphone input. Double check your plugs to be certain you have them correct. You may try muting the output of your phone (but not the mic) to see if that eliminates the feedback. If muting the output fixes your problem, you may still want to find a cable setup that doesn’t require this.
- Some devices (usually laptops) are able to accept different types of plugs. Verify that your laptop is set to expect the plug you have inserted.
- Verify that your device is actually using the mic input you are supplying. Turn the building audio system off and verify that the mic input goes silent.
- If you hear a hum in your sound, this likely indicates the presence of an electrical phase/ground loop, running from the sound system to the laptop through the audio cable. Decouple the two systems with a hum eliminator such as this. You can also disconnect the laptop’s power supply to remove the hum, if the battery life of the laptop is sufficient.
----------------------------------------------------------------------------------------------------------------------
iYour building probably has a combination of balanced audio jacks and unbalanced audio jacks. Balanced audio typically uses 3 connectors with one wire carrying ground and the other two carrying the signal and the inverted version of the signal. By balancing the signal with its inverted version, interference is reduced. Interference is a function of cable distance and balanced audio is ideal for long cable runs and is probably the most common input connector in your building. Most of our building microphones and microphone cables use balanced audio cables having XLR jacks.
ii The measurement refers to the diameter of the plug. iii ¼ inch plugs are often used for balanced audio – frequently used to connect an audio system to powered speakers. iv 2.5 mm plugs are less common, but sometimes used in devices with very little room for a jack. v Tip Ring Ring Sleeve
vi There are actually 2 line levels, professional and consumer. Mic levels vary drastically with the sensitivity of the microphone. Nominal levels: mic: 5-50mV, consumer Line: 0.32V, professional Line: 1.23 V. In our meetinghouses, the mic Inputs levels vary depending on the sensitivity of the mic most commonly connected to it, so the pulpit, sacrament, and others all have different levels, since they typically are connected to different microphones. The aux output in the chapel is consumer line level. If there is a line output in the AV rack (for the Teradek) it is set up for pro line level.
viii In the newest buildings, with HD Video systems, there are XLR style outputs in AV rack. It is standard practice in the industry to use female jacks for inputs, and male jacks for outputs. Our systems follow the same standards. ix Often times the signal flow has multiple gain control knobs. Any one set at zero can zero out the signal. Any one set at max can create overdrive. Suggest starting with all gains at 50-75%. If using a device with input gain control first get chapel volume right and then use the device’s gain control to make it right for remote viewers.

